


1960s Inspired Lash Sets: How to Balance Upper and Lower Lash Definition

Create better 1960s inspired lash sets with central peaks, wispy spikes, bottom lash balance, and safe mapping tips for every eye shape.
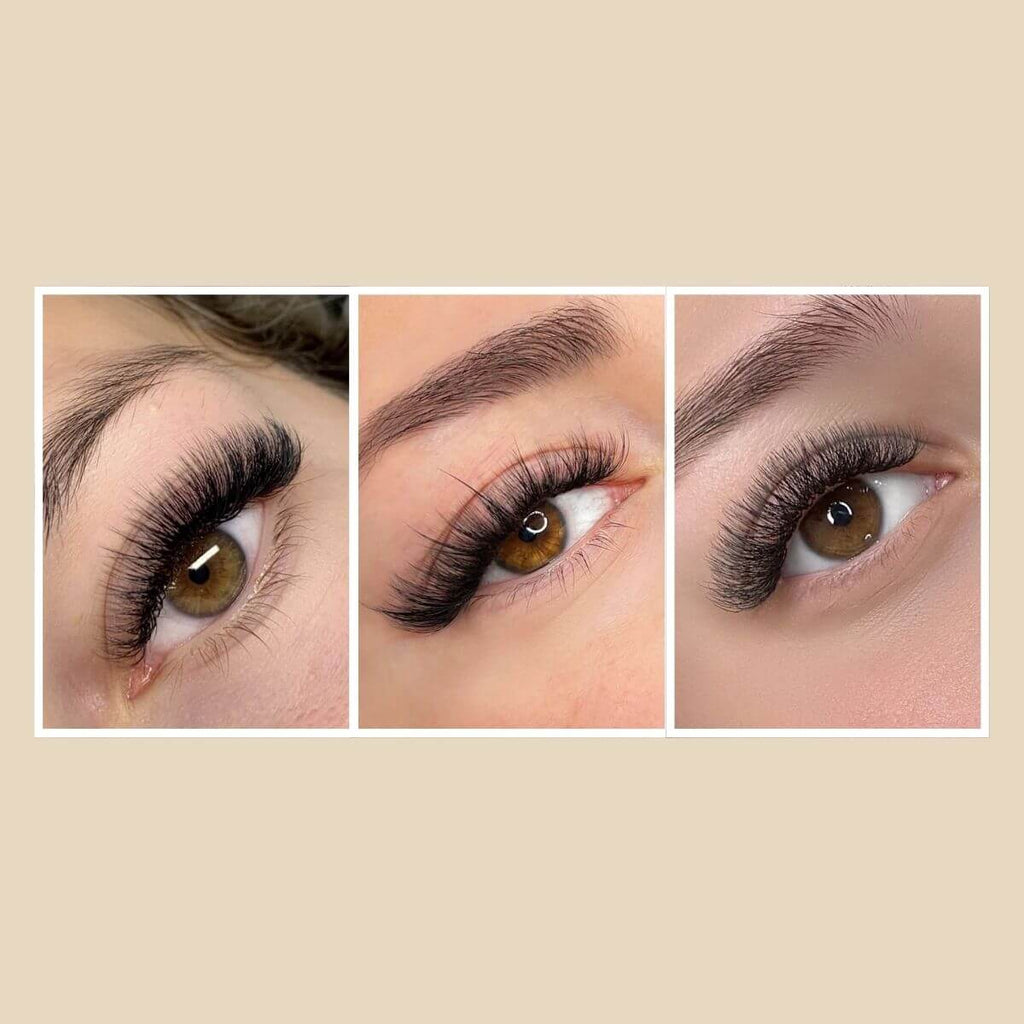
A balanced 1960s inspired lash set keeps the upper line dominant: create a rounded central peak, separate the longer sections, and use shorter, more widely spaced bottom lashes.
Which Features Define a 1960s Inspired Lash Look?
A 1960s inspired lash look is defined by central upper length, visible spike separation, and lighter lower-lash placement.
Central Upper Length
Place the longest upper extensions near the pupil or slightly outside the center. Increase length gradually toward the peak, then taper before the outer corner.
This placement creates the rounded shape associated with 1960s eye makeup without pulling the eye excessively outward.
Use a lash map based on eye shape to assign the length, curl, and density of each section before application.
Separated Upper Sections
Place narrow spikes between shorter filler lashes. The spikes should remain visible when the client opens her eyes, while the fillers prevent gaps from looking accidental or patchy.
Classic wispy lashes suit this structure because they combine defined peaks with shorter surrounding lengths. Vary the spacing slightly so the pattern does not look mechanically uniform. A wispy lash styling guide can help plan spike-to-filler contrast.
Lighter Lower Definition
Keep the lower lash pattern shorter, lighter, and less continuous than the upper set. Place the strongest lower definition beneath the central upper peak, then reduce length and density toward both corners.
Avoid using one length across the entire lower lash line. A uniform row can create a heavy strip beneath the eye and compete with the upper design.
How Much Upper Lash Length Keeps the Eyes Open?
There is no universal ideal length; the maximum should be determined by natural lash condition, lid depth, eye size, curl, and visible eyelid space.
Build the upper map in this order:
- Start with short extensions at the inner corner.
- Increase length gradually toward the pupil.
- Hold the longest length for one or two sections when a rounder effect is needed.
- Taper before the outer corner.
- Check the complete shape with the client’s eyes open.
Do not add length solely to increase lift. A more visible curl can raise the lash line without adding unnecessary weight or causing the tips to extend too far from the eye.

When Do Bottom Lashes Add Definition Without Looking Heavy?
Bottom eyelash extensions add useful definition when they remain shorter, lighter, and more widely spaced than the upper set.
Eyelash anatomy research lists approximately 75 to 80 lashes on the lower eyelid and 90 to 160 on the upper eyelid. Because the lower lash line contains fewer natural lashes, most lower-lash maps use fewer extensions and lighter coverage.
Use these criteria when planning the lower map:
- Eye size: Smaller eyes usually need fewer defined lower sections.
- Upper lash weight: Fuller upper sets require lighter lower placement.
- Natural lash direction: Follow the growth angle of the client’s bottom eyelashes rather than forcing every extension downward.
- Central position: Place the clearest definition beneath the pupil or upper peak.
- Corner density: Keep both corners short and sparse to avoid visually closing the eye.
- Intended use: Reserve longer lower extensions for editorial shoots or dramatic event looks.
For daily wear, use short lengths with visible gaps rather than filling every suitable natural lower lash.
How Should Upper and Lower Lash Spacing Work Together?
Upper and lower spacing should share the same central emphasis without matching each other in length, density, or coverage.
Negative space is the visible gap between defined lash sections. It prevents the design from becoming crowded and helps individual spikes remain visible.
| Lash Area | Upper Lash Design | Lower Lash Design |
|---|---|---|
| Inner corner | Short with light coverage | Minimal or very short |
| Inner center | Gradual length increase | A few short extensions |
| Center | Longest lengths and clearest spikes | Strongest lower definition |
| Outer center | Gradual taper | Wider spacing and shorter lengths |
| Outer corner | Soft, early taper | Light and short |
Before finishing, compare both lash lines from the front. The lower center should align visually with the upper peak without matching its length or density.
Adjust the planned map when the client’s natural lash direction, density, or strength cannot support the intended placement.
Which Eye Shapes Need a Softer Retro Interpretation?
Small, round, downturned, close-set, and deep-set eyes usually need adjustments to the standard central-peak map.
- Small eyes: Retain the central peak but reduce the number of lower extensions.
- Round eyes: Move the upper peak slightly outside the pupil to avoid exaggerating roundness.
- Downturned eyes: Begin tapering earlier at the upper outer corner and minimize lower outer lashes.
- Close-set eyes: Reduce inner-corner density and shift some upper length toward the outer center.
- Deep-set eyes: Choose a curl that remains visible above the lid and keep the lower pattern simple.
- Sparse lower lashes: Use a few isolated extensions instead of attempting continuous coverage.
Evaluate the final map from the front rather than relying only on the closed-eye application view. Lid position can change the apparent location of the peak and the visibility of the spacing.

How Can the Look Be Adapted for Everyday Wear and Photography?
For everyday wear, reduce contrast; for photography, increase the separation that needs to remain visible on camera.
Everyday Wear
Use:
- Fewer upper spikes
- Moderate differences between spike and filler lengths
- Light upper inner-corner density
- Lower definition concentrated near the center
- Minimal lower-corner coverage
- Brown or soft black lashes when appropriate
For a softer version, use classic lash extensions as a one-to-one base and add only a few longer central spikes.

0.18MM Cashmere Premium Classic Eyelash Extensions
Thickness: 0.18
Curl: C
Length: Mixed 8-15mm
Photography
Use clearer upper spikes and wider spacing between defined lower sections. Small differences that are visible at close range may disappear under studio lighting or in full-face images.
Check the set under lighting similar to the planned shoot and review a straight-on photograph for uneven spacing, hidden spikes, or excessive lower density.
What Safety Checks Are Necessary?
Do not continue the service when the client has active redness, swelling, pain, persistent irritation, or uncontrolled tearing.
Constant watering can interfere with isolation and adhesive placement. Extensions should also be matched to natural lash strength rather than applied according to the planned map when the natural lashes cannot safely support them.
Use clean applicators, check product ingredients, and follow eye-area instructions. The FDA’s eye cosmetic safety guidance covers applicator hygiene, ingredient checks, and proper product use around the eyes.
Create a Balanced 1960s Lash Set
Map the central peak before the appointment, then select lengths, curls, and lower-lash spacing that match the client’s natural lashes. Check the design with the eyes open and make any final adjustments before completing the set.
FAQs
Q1. How Long Do Bottom Lash Extensions Usually Last?
Bottom lash retention varies with the natural shedding cycle, cleansing habits, skincare products, and contact with the lower eye area. Schedule a refresh based on how many extensions remain and whether the original pattern is still even. Retention varies with the natural shedding cycle, skincare products, cleansing habits, and contact with the lower eye area.
Q2. Can Clients Wear Mascara on Bottom Lash Extensions?
Mascara is usually unnecessary and may leave buildup around the adhesive bonds. When additional color is required, use a lash-extension-compatible formula and avoid waterproof mascara.
Q3. Do Bottom Lash Extensions Need a Separate Fill Appointment?
Not always. They can be refreshed during an upper lash fill when enough appointment time is reserved.
Book a separate appointment when most of the lower pattern has shed or detailed remapping is required.
Q4. How Should Bottom Lash Extensions Be Cleaned?
Clean them with an extension-compatible cleanser and avoid rubbing the lower eye area. Rinse away cleanser residue, allow the lashes to dry, and brush only when needed and when fully dry.

Q5. Can Lower Lash Extensions Be Removed Without Affecting the Upper Set?
Yes. A trained lash artist can isolate the lower extensions and remove them with a professional remover while protecting the upper set with pads or tape. Do not pull or pick at the extensions, as this can place unnecessary pressure on the natural lower lashes.
Leave a comment